Tuesday, November 2, 2021

Eden's Garden Release


         It's Available Today! If you love Shade's of green, this set is perfect for you. The richness of Evening Evergreen, Soft Succulent, and Gold Foil accents in the Designer Series Paper will easily combine with other great colors in our Color Families, try Just Jade, Cherry Cobbler, Night of Navy, Magenta Madness. I loved cutting up the die-cuts to create custom shapes and the Cotton Paper to add unique texture. The Garden Gems are to die for, I love anything sparkly, especially for Christmas! 

    Keep in mind that if you want any of this collection , or even all of it! The Designers Series Paper, Cotton Paper and Gems are only available while supplies last, so pick them up quick to avoid disapointment. 

What a beautiful Suite wheather you want a card, a box, scrapbook or create a memories & more page. The greatest thing about this product line is that it is suitable for any occasion! Here are a few ideas to inspire you:) 


    If you would like to shop for the Eden's Garden collection use the shopping link in the sidebar, and if you have any questions please contact me, I'm happy to help :) 

Paper Hugs, 
Shanna 


Saturday, October 30, 2021

RETRO CHRISTMAS WITH NEW BLING


        Hello, 

            Welcome to Week 9 of Retro Christmas, I hope you have the Retired Merry Moose Stamp Set in your collection for this fun card using it, and paired up with the Plaid 6x6 Designer Series Paper make it the perfect neutral card for those that don't like all the flash christmas colors, But really who doesn't like all the bling colors of christmas? I know I do, I change up the coloring of decorations on my tree yearly. Humm.. What's your guess of what colors I will use this year? 


    Now the card and how you too can create it ....


Stamp Sets: Whimsical Trees, Merry Moose (retired).
Tasteful Touches Embossing Folder.
Ink: Memento Black,Cherry Cobbler, Evening Evergreen,VersaMark.
Stampin' Bleands: Bronze, (D) Crumb Cake.
Markers: Chalk, Cherry Cobbler.
White Embossing Powder & Heat Tool.
Holiday Rhinestones.
Plaid DSP (retired) 3/4' x 3 1/16'.
Basic Black Cardstock 3 1/16' x 1 7/16'. 
Scrap of Crumb Cake Card Stock for stamping.
Crumb Cake Card Stock Base 5 1/2' x 8 1/2' , scored at 4 1/4'.
Crub Cake Card Stock Layer 5 1/4' x 4'.
Basic White card Stock (inside) 5 1/4 ' x 4'. 

Start by stamping three Whimsical Trees in the center of the Crumb Cake Layer 5 1/4' x 4' piece, with the Memento Black ink. Insert that Card Stock into the Tasteful Touches Embossing Folder and run it through the Cut & Emboss Machine.Layer the embossed layer onto the Crumb Cake Card Stock Base.  On the scrap of Crumb Cake Card Stock, stamp the moose, and hat in Memento Black Ink. In Cherry Cobbler Ink stamp the scarf. With your Stampin' Blends color the moose in dark Crumb Cake, and the antlers in Bronze. with the Cherry Cobbler Marker color the hat , and use the Chalk Marker on the pom pom and hat fold. Fussy Cut out the moose, hat and scarf. Layer the hat and scarf on the moose with Tombow Glue to secure. On the top half of the Basic Black Card Stock piece stamp your greeting in VersaMark and sprinkle with White Embossing Powder, Heat Set. With Stampin' Seal apply the Plaid DSP to the bottom half of the Black Card Stock. Layer that piece flat on to the card front, in the lower righthand corner. With Dimensionals layer on the moose. Accent the stamped trees with the Holiday Rhinestones, making them look like ornaments. Stamp the Basic White Card Stock inside piece and envelope with Evening Evergreen Ink and the smallest tree stamp from the Whimsical Trees Stamp Set. Your card is ready to send out right away. 

    I hope you'll pop in next week to see what I have in store for Week 8 of the series. Til then. 

Paper Hugs, 
Shanna 


12 WEEKS TIL CHRISTMAS COUNTDOWN SERIES


    Hello , 

    Welcome back to Week 9, in the Countdown to Christmas Series. Have you started your cards yet ? It is sneaking up on us quickly. I find it so hard to be a month ahead of myself in making christmas anything really, but this series is forcing me to get my act together :) So Today I have a fun card using the Alcohol Technique and Shimmer Vellum. Its fun the kids could help with this prep work and each card is so uniquely different.


Supply List:

·        Whimsical Trees Stamp Set & Christmas Trees Dies.

·        Christmas to Remember Stamp Set & Seasonal Labels Dies.

·        Ink: Evening Evergreen, VersaMark .

·        White 3/8’ Glittered Organdy Ribbon - 2 ¾’.

·        Wintery 3D (pine boughs) & Evergreen Forest 3D Embossing Folder.

·        Blender Brush & Water Painter Brush.  

·        White Embossing Powder & Heat Gun.

·        2021-2023 In C In Color olor Shimmer Vellum – Evening Evergreen.

·        2021-2023 In Color Jewels

·        Chalk Marker & Wink of Stella Pen.

·        Stampin’ Blend : Evening Evergreen

·        99%  Isopropyl Alcohol.


Dimensions:

·        Soft Succulent Card Stock Base Layer  5 ½” x 8 ½ “, scored at 4 ¼".

·        Soft Succulent Layer 5 ¼ “ x 4”.

·        2021-2023 In Color Shimmer Vellum 5 ¼ ” x 4“.

·        Basic White Card Stock 5 1/4 “ x 4” for inside layer

·        Scrap of Basic White for die cut of sentiment. 


Instructions:

            Take your Soft Succulent layer piece and insert straight in the Evergreen Forest 3D Embossing Folder, turn through the Cut & Emboss Machine. Using your Chalk Marker & Wink of Stella add some speckling over the tree embossed layer.(To create the speckling, I “flicked” the tip of the Marker and Stella Pen against the inside edge of the cap, and “flicked” outward towards the cardstock) **Make sure to have only this paper piece on the desk at this time as speckle goes everywhere. Adhere this layer down using Stampin’ Seal, to your Soft Succulent Card Stock Base that you have folded in half. 

Next, on our 2021-2023 In Color (Evening Evergreen) Shimmer Vellum piece we will do the Alcohol Technique.
    Step by Step: Using a bit of removable tape secure your vellum sheet to a plastic Ziploc bag on your desk top to protect it.( you can use DSP backing sheets as well.) Begin scribbling randomly with the Evening Evergreen Stampin’ Blend onto the Shimmer side of the In Color Vellum. When you have the desired amount of color scribbles down, put a bit of 99% Isoproply Alcohol in the cap of the bottle, take your Water Painter Brush (empty of all water)  dip into the Alcohol and dab onto the areas you have scribbled. It will start to dilute and run to make a cool design. Set aside to dry.

With Evening Evergreen Ink and the Sentiment from the Christmas to Remember Stamp Set, stamp on to your scrap of Basic White Card Stock, Then die cut out on the Cut & Emboss Machine using the Seasonal Label die that coordinates. Your Vellum Technique piece should be dry, Take tree pattern stamps from the Whimsical Trees Stamp Set and stamp in VersaMark right onto the vellum, Sprinkle with White Embossing Powder and heat set.
 With the Christmas Trees Dies, cut out tree shapes in various sizes with the Cut & Emboss Machine. Apply Dimensionals to the backs of the tree diecuts and layer in the right hand corner of your card front embossed layer. Attach with a strip of Stampin’ Seal on the back side of your sentiment cutout your diagonally end cut White Glittered Organdy Ribbon, then apply Stampin’ Seal to attach whole cutout to your card front.
                     
Decorate with 2021-2023 In Color Jewels in Evening Evergreen.
 For the inside, run just the edge of the Basic White Card Stock thru the Cut & Emboss Machine with the Wintery 3D Embossing Folder (pine boughs). Highlight with a Blender Brush and Evening Evergreen Ink, ever so lightly. 


    Don't you just love this card? The Whimsical Trees Collection  is so much fun to create your own forest of whimsy. I hope this inspires you to give the Alcohol Technique a try and make your own beautiful collection of cards. Drop back in next week to see whats in store for Week 8 :) 

Paper Hugs, 
Shanna  

Monday, October 25, 2021

FALL & HALLOWEEN WRAP UP

     Hello,


    Well we had our fun with this series didn't we? ....I know I sure did :) I enjoyed creating all of these samples to share with you, this week wraps it up, we have to move on to the next Holiday Season so we can spark your creativity. If you haven't already Subscribed to my blog , nows the time so you don't miss out on anything... its going to be EPIC! 

    Let's wrap Halloween up first :) When this posts it will be 6 days away, are you ready? Got your candy? Got a Costume for the Kids, Dogs & You ? How many EXTRA BAGS ( as in you ate the other bags you bought before halloween) have you bought? HeHeHe, I'm on my third, I'll admit it, so tempting those cute bite size chocolate bars and I can't craft without treats ;) 


Cutest Halloween Stamp Set 
Basic Black Cardstock Base  5 1/2' x 8 1/2', scored at 4 1/4'.
Pumpkin Pie Cardstock 4 1/4' x 2 1/4'.
Be Dazzling DSP Scraps for letter die cuts. ( adhesive sheets on back) 
Scraps of Pumpkin Pie & Basic White Cardstock for diecuts.
Dies: Circles, Playful Alphabets.
Ink: Craft White, Black Memento, Pumpkin Pie, Pale Papaya, Calypso Coral, VersaMark.
White Embossing Powder & Heat Tool. 
Embelishments: Holiday Rhinestones - in Pumpkin Pie.
Metallic Mesh Ribbon
Chalk Marker. 

    Start with the candy corn stamp inked in VersaMark on your Pumpkin Pie Cardstock, in various directions. Then sprinkle with White Embossing Powder & Heat Set. Attach that strip to your Basic Black Card Base with Stampin' Seal. With the White Craft Ink, stamp the spider off the sides of the Pumpkin Pie strip you just places down. Let that dry for a few minutes ( as the craft ink takes a bit to dry). Meanwhile we will cut out Circles Diecuts with the Cut & Emboss Machine out of our Pumpkin Pie & Basic White Cardstock scraps. Also with the Playful Alphabets Dies and Be Dazzling DSP scrap cut out the letters BOO, and exclamation mark. Layer up your diecuts, Basic White circle onto Pumpkin Pie scallop circle base. With Tombow Mulit Glue attach your Be Dazzling letters following around the edge of the circles. On a Basic White Cardstock scrap stamp three pumpkin outlines in Black Memento Ink, with the fill in layer stamp , color in with your Pumpkin Pie,Pale Papaya & Calypso Coral Inks. Stamp on faces of your choice. Cut a length of Metallic Mesh Ribbon to fit the length of your Pumpkin Pie Cardstock layer ( 4 1/4') and attach with Glue Dots. On the back of your Circle Diecuts place Dimentsionals around outside, remove backings and place center of the card front over top of your Metallic Mesh Ribbon. Randomly add Pumpkin Pie Rhinestones to your card front. Decorate your inside & envelope, and your ready to send to a trick a treator in your life :) 

    That's a wrap on this series, I look forward to next years. Happy Halloween Everyone!!! 

Paper Hugs, 
Shanna  

Saturday, October 23, 2021

RETRO CHRISTMAS WITH NEW BLING


Hello, 

    Welcome back to Week 10,In the Retro Christmas with New Bling Series.  Snowmen, girls, people are the theme this week, if you have seen the card for 12 Weeks til Christmas Countdown Series already :) Who doesn't love happy snowpeople? So as you know, or maybe not if you have just joined My Blog and the Series. I came up with the Idea of this Series to be able to still use and share some ideas with you, with some of my Retired Stamp Sets & Dies. But still to add in elements of new Embellishments, DSP, Embossing Folders, etc.      

    So today we are going to go Wayyyyyy Back, to 2012 when Stampin' Up! ® had a series of Single Stamps, meaning you could purchase just one stamp. Which I loved this concept, and if you have been a customer of mine that long you will remember I did a monthly class designed specifically around one of those stamp choices and you made three idea cards to get the creative juices going on ways to use it. Which gets me thinking I should recommend Stampin' Up! ® bring that option back :) Don't you agree? 


    So lets have a look at my card and tell you how to make it... 

Retired Frosty Friends Single Stamp 

Retired Lucky Stars Embossing Folder

Retired Dazeling Details

Thick Basic White Card Stock Base 4 1/4' x 11', scored at 5 1/2'.

Basic White Card Stock Layer 4' x 5 1/4'.

Rose Gold Metallic Specialty Paper 3 1/4' x 4 3/8'.

Watercolor Paper 2 1/16' x 4'.

Kraft 6x6 DSP Paper 3/4' x 3'.

Stitched Rectangle Dies.

Ink: Black StazOn Ink, Blushing Bride. 

Watercolor Pencils, Water Painter Brush. 

Opal Rounds.

Sentiment from Snowbody Better Stamp Set. 


How to:  Insert your Basic White Card Stock Piece into the Lucky Stars Embossing Folder, and turn thru the Cut & Emboss Machine. Layer the back with Dimensionals and attach to your Thick Basic White Card Base. Next, layer the third size down from largest of the Stitched Rectangle Dies on your Rose Gold Metallic DSP and turn that thru the Cut & Emboss Machine. With a paper trimmer on the short sides of the die cut piece, trim off the stitched part on both sides, you want the total length trimmed off to be 4 1/4'. With Stampin' Seal adhere that down to the embossed layer on your card front. In the middle of your Watercolor Paper using the StazOn Ink , stamp your image centered on the paper. Color in your choosen colors the stamped image with the Watercolor Pencils, when done go over the colored pencil areas with the Water Painter Brush, make sure not to over saturate as it will not look nice. To create a snow layer I used Dazzeling Details which is retired but our current Shimmery Crystal Effects will give a simalar look. You need to let that dry for a bit, to overnight if you can. When its dry apply Dimensionals to the back and adhere to the Rose Gold Metallic layer. On the Kraft 6x6 DSP paper stamp the sentiment of choice in StazOn Ink , and flag the one end to create a banner look, trim off other end to the length your happy with. Apply three Opal Rounds to the card front. Apply some snowflakes stamped in Blushing Bride Ink on the inside & envelope and your ready to send out the card. 


     Hope you have enjoyed this weeks Series, stay tuned for what I have in store for next week :) 


Paper Hugs, 

Shanna  


12 WEEKS TIL CHRISTMAS COUNTDOWN SERIES


    Hello, 


        Welcome to Week 10 on our countdown til Christmas Series. I sure hope you are finding ideas for your holiday cards from these posts. I had so much fun creating this week with the Snowbody Better Stamp Set from the July - December Mini Catalogue 2021. If you haven't noticed this set pop over to page 28. The image is huge and perfect for Stampin' Blends coloring like I did, or watercoloring with Pencils or Ink.This one is a for sure keeper in my Craft Stash. 

 Here's what you need to make it:

Snowbody Better Stamp Set 

Wonderful Snowflakes 

Stitched Rectangle Dies 

Whimsy & Wonder DSP 4' x 5 1/4'.

Thick Basic White Card Stock Base 5 1/2' x 8 1/2', scored at 4 1/4'.

Scrap of Blushing Bride Card Stock for the sentiment.

Basic White Card Stock 3 1/2' x 4 3/4' for diecut.

Ink: Memento Black, Pool Party, VersaMark. 

Stampin' Blends: Pool Party (L),Flirty Flamingo (L), Misty Moonlight (L&D), Pumpkin Pie (D).

White Glittered Organdy 3/8' Ribbon.

Metalic Pearls in silver.

Silver Embossing Powder & Heat Tool. 


Start by adhering your DSP piece to your Thick Basic White Card Stock Base with Stampin' Seal.Next, with the Stitched Rectangle Dies and the Basic White Card Stock for die cutting, you will run together the layer thru the Cut & Emboss Machine. Using Black Memento Ink and the snowpeople image you will stamp that on your Die Cut Rectangle piece. With your Stampin' Blends color in the snowpeople how you like, note the pool party was used to add highlighting on the whites of the snow for more definition. When done, apply Dimensionals to the back of the colored in piece and adhere to the center of the DSP on the card front. Place a Wonderful Snowflake in the top left corner with a Glue Dot in the center. Cut a second one in half and place in the lower right corner tucking behind the die cut layer. With the VersaMark Ink , pick a sentiment and stamp that onto your Scrap of Blushing Bride Card Stock, Sprinkle with Silver Embossing Powder and Heat Set. Fussy Cut around the letters to your desired look. Place a Glue Dot in the lower left corner of the die cut rectangle and "z" your ribbon by securing on the Glue Dot, you may need more than one. With Dimensionals on the back of the Sentiment, attach that over the ribbon middle to hide your Glue Dots. Place three Sliver Metallic Pearls on the card front. Finish your inside & envelope with the snowflackes stamped in Pool Party Ink, and the hat stamped in Black Memento and colored with Stampin' Blends to match what you did on the card front snowpeople. 


    Doesn't this card make you smile? Wonderful Stamp Set for Family Christmas Cards with your traditional letter tucked inside, or add another strip of DSP on the inside to hold a Gift Card for a Timmies or Starbucks for the kids to give to a Teacher or Bus Driver. Come on back next week to see whats in store for Week 9. 


Paper Hugs, 

Shanna 


Monday, October 18, 2021

WEEK 2 OF FALL & HALLOWEEN

     Hello, 


    We are winding down this series and have already begun our Christmas one! I hope you have been enjoing the cards I have been sharing. I love this time of year, so finding time to spend in the studio is very easy when you don't have outside work to do, grass to mow, and all those fun chores...HaHaHa Not! I would much rather relax in a deck chair and soak up a bit of sunshine. Our card for this week uses Gorgeous Leaves Stamp Set, which is fitting for my neck of the woods as the leaves are amazing in all the different colors. 

    
Inspired by SU Artisan Tammy Wilson with my spin on it. 

Gorgeous Leaves Stamp Set
In Your Words Stamp Set 
Card Base - Pumpkin Pie Cardstock 5 1/2' x 8 1/2', score at 4 1/4'.
Basic White Cardstock 5 1/2' x 2 1/2'.
Early Espresso Cardstock  2 3/8' x 5 3/8' - for diecut.
Vellum   4' x 1'. 
Dies: Ornate Layers, Seasonal Labels. 
Macrame Embossing Folder 
Sponge Dauber.
Gold Embossing Powder & Heat Tool. 
Ink: BumbleBee, Early Espresso, VersaMark.
Markers: Pumpkin Pie, Early Espresso,Wink of Stella.
Embellishments: Gineal Gems, Gold Guilded Gems, Metallic Gold Pearls.
Ribbon: Gold 3/8' Fine Art, Gold 1/4' Shimmer,Linen Thread.  

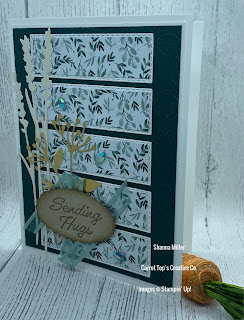
    For this card, I started with Pumpkin Pie Cardstock Base , embossed it with the Macrame 3D Embossing Folder thru the Cut & Emboss Machine. I then used the large leaf stamp, to create a row of leaves on the Basic White Cardstock Strip.For each leaf, I stamped it in Bumblebee Ink first, then used a Sponge Dauber to add some Early Espresso Ink around the edges. After I stamped each leaf, I cleaned the stamp before stamping the new leaf. I also used my Early Espresso and Pumpkin Pie Markers, as well as Wink of Stella, to add some speckling. ( To create the speckling, I "flicked" the thick end of the marker against the inside edge of the marker cap, and "flicked" outwards towards the cardstock.) 

    I tucked a Early Espresso Cardstock border underneath the top and bottom edges, using one of the Ornate Layers Dies, cut down to fit the length of my Basic White Leaf Stamped piece.The sentiment ( from In Your Words Stamp Set) was stamped in VersaMark on to the Vellum , sprinkled with Gold Embossing Powder & Heat Set. Cut out the Vellum embossed piece with the Seasonal Labels Die thru the Cut & Emboss Machine. Layer with Stampin' Seal the boader strips behind the Basic White Cardstock strip, Adhere that to your Card Front. Pop on the Sentiment diecut with Glue Dots hidden behind the embossed words so they are not visable.
    To add some extra texture, I created a bow with Linen Thread, Gold Fine Art Ribbon and Gold Shimmer Ribbon (both cut in half vertically) Layer one on top of the other secure with Glue Dots. For a bit of Bling, Sprinkle on Gold Gilded Gems,Genial Gems and Gold Metallic Pearls. Decorate your inside & envelope, your ready to send off! 

    Come back for the last week in the series net week, Halloween is the feature as it is very close. 

Paper Hugs, 
Shanna