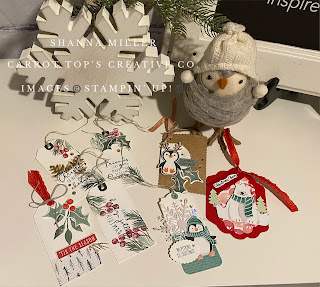
Saturday, December 4, 2021


 Hello, 


            Welcome to Week 4, by now you may have the twinkle lights hung,the reindeer have made their enterance, and you have jingled you halls, walls and family(for photos that is:). 'Tis the season now for making and sharing delicious treats! Christmas is a festive time of the year when we celebrate our family, friends, neighbours and pets. Since it is often a busy time of year, I have put together some ideas to package up your treats. What better way to celebrate than with a homemade gift crafted with love & care ?


        Have you taken a look at all our Fantastic Packaging Basics on page 137 of the Annual Catalouge? In my Sample ideas you will find a mix of old and new products. I incourage you to always have a look at these and check the clearance rack area in my store as you will find great things to use not only at christmas but all year round for your gift packaging needs, you just never know when you need to whip up a little last minute treat :) 


        Our Ombre Gift Bags are perfect to hold a Gift Card, Homemade Cards, a Popcorn or Chex Mix  Treat or even a Gift & Card combo. You get 20 bags in 4 of each of the new In Colors and these are Food Safe. Can't beat this great deal. 


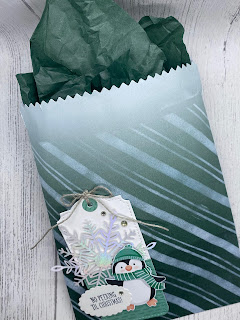
        These Kraft Gift Boxes came out in the July- Dec 2021 Mini Catalouge, another great way to package some handmade cards, gingerbread cookies, a pair of gloves & hand cream for these cold wintery days. You get 10 boxes with the acetate window already there, so you just have to decide how to decorate, they are also Food Safe. 


        Now I am the Queen of little gag treats, and these Poop treats make a great stocking stuffer for the kids. The test tubes I picked up from a big box stores dollar bin goodies, so I just added my treats and made a cute tag to compliment. For the Snowman one I used a retired product Kraft Pillow Boxes and again just made a cute tag & emblishments. Would you eat Poop if it was this cute ? HAHAHAHAHA


        Our Clear Acetate Boxes come in two sizes, One fits 5cards and envelopes perfectly and the smaller one will hold tea packets or 5 3x3 cards and envelopes . You get 10 boxes per pack, and you just have to embellish for the perfect last minute gift, or package up a few to have on hand for anyone who stops by to visit, a teacher gift. These are great to have on hand year round for anything. 


         The Hot Chocolate and Bailey's gift pack is my Live Facebook Crafting on Dec.4.2021 tune in to see how I make it. The Cup Carriers are Retired, but the cups are current, you can make a great gift with a Timmies gift card and chocolate, dress up the front and you are good to go! TO GO that is !!!!LOL  You get 8 cups and lids in set and they are also food safe.These Copper Tins are very much Retired, but I may have stocked up on them :) these I have made into a Get Well Kit, they contain honey, advil, tea, Chckien noodle soup packet, hand sanitizer, halls and a 3x3 get well card. If someone is under the weather this is something easily you can drop off on their door step to get them back on the mend. 


        Hope you have LOVED the Ideas and your mind is turning with all that you can do with our packaging, take a look if you haven't already and keep an eye out for new stuff coming in the january mini catalouge. See you next week for Week 3 of the Series, and happy packaging.


Paper Hugs, 

Shanna  


Saturday, November 27, 2021

RETRO CHRISTMAS WITH NEW BLING SERIES


             Hello, Week 5 is here and we are starting to get packaging add ons done, so this week we are focusing on Tags, cause what gift says "you made it", if it doesn't have a homemade tag too.And let's be honest a gift is not complete in my eyes without the Tag stealing the show, so we better make it cute right? As you can see in todays photos, the studio have gotten a little christmas makeover to get you in the spirit and ready to start packageing up some of those great Black Friday deals you may have taken part in :) No judgement here ! I have taken part myself and gotten some great locally made items for gifts this year, to pair nicely with my homemade things :) 
        Bringing out some of my favorite Retired Items, not all have new bling mixed in this week, but you can jazz up the tags you make however you like, you can bling up a bag, box,wrap, that is the beauty of collecting and using what you have :) And this could be a prelude to next week , hint hint!
Alpine Adventure Stamp set, Alpine Sports Thinlits Dies, Tailored Tag Dies, Plaid Tidings 6x6 DSP, Linen Thread, Embroidered Ribbon, Pointsettia Dies.
Free Skate Stamp Set, Detailed Skate Dies. & Tailored Tag Dies, In the Pines Stamp Set,Tags & Feathers Elements.
Stitched Stocking Stamp Set, Stocking Builder Punch, Plaid Tidings 6x6 DSP, Detailed Skate Dies, Eden's Dies, Rectangle Stitched Dies. 
Fox Builder Punch, Cork DSP, Alpine Sports Thinlet Dies, Deco Labels Dies, Knit Together Stamp Set. 
Ornate Layers Dies, Circle Dies, Peaceful Noel Stamp Set, Linen Thread, Fine Art Ribbon.


        I had so much fun creating these, I hope you are inspired to step up your packaging game, if you don't already :) And if you need help or ideas with that come back next week to see what I have in store for Week 4 of Gift Packaging. 

Paper Hugs, 
Shanna 
  

12 WEEKS TIL CHRISTMAS COUNTDOWN SERIES


          Hello, Week 5 is here, holy cow!!!! its getting closer, I hope you have been doing a bit of shopping early as the delays on some things seem to be unknown, and you have to plan quickly in case. That's my PSA LOL. I like to make handmade gifts as much as I can, and I do have quite a collection in my studio of many different things, so I made a good effort when I did my studio makeover to make a list of what I had on hand and plan out those gift items I wanted to make, now the key to this is ..... time, finding the time in my schedule has been the challenge . but day by day I check an Item off the list and keep on going:) Have you got a Naughty or Nice List ? hehehehe.


    The most inmportant part of handmade gift giving is that you can customize to the person the gift is for , by their favorite color, animal, shape or maybe their favourite Stampin' Up!® products. This week I have focused on tags, as we move forward packaging will come into play as well. I think you will find these tags to be quick , easy and to the point of being the dress up to whatever package you are going to add them too. Another tip is that they can easily be added to some card stock bases and turned into a card for next year, how cool is that to upcycle? 


Cherry Cobbler,Painted Christmas DSP, Real Red Mini Ruffled Ribbon, Red Velvet DSP, Tailor Tag Dies, Seasonal Label Dies, Penguin Playmates DSP fussy cut outs. 
Kraft 6x6 DSP, Rose Gold Metallic DSP, Pengin Place Stamp Set, Christmas Season Stamp Set, Timeworen Type Embossing Folder, Champagne Rhinestones, Flirt Flamingo Metallic Ribbon, Linen Thread, Stitched So Sweetly Dies. 
Tailored Tag Dies, Penguin Playmates DSP, Wonderful Snowflake, Basic Rhinestones. 
Tailored Tag Dies, Christmas Seasons Stamp Set, Seasonal Labels Dies, Linen Thread, Gold Guilded Gems.

Tailored Tag Dies, Christmas Season Stamp Set, Christmas to Remember Stamp Set, Seasonal Label Dies, Real Red Mini Ruffled Ribbon, Linen Thread, Be dazzling DSP, Tidings of Christmas 6x6 DSP.

        These are pretty cute hun? I hope you loved them, tune back in next week for ways to add them onto packaging and some other fun ideas, If you create some of your own I would love to see them, post here in the comments, post on my socials or tag me on your social post. See you soon , Happy Tag making :) 

Paper Hugs, 
Shanna 


Friday, November 26, 2021

IMPORTANT INFORMATION ON BACKORDERS


        Stampin' Up! is making a significant change, but important one that I want you to be aware of. 


    Starting December 1,2021, Stampin' Up! will no longer allow out-of-stock products to be purchased      ( ex. they will no longer take backorders). In a nutshell, with all of the global shipping delays, shortages, and whatever else may come up in the months to come. They are protecting you the customer from ordering, paying ,and not recieving that item for 2-6 months. So I guess it is a Don't Wait to order sinario, as you you may not get that item(s) you had your heart set on. 


    The Bonus of my last post on the join special right now, is that its $100 you get early access to new products before the non demonstrators. so you are sure to get what you love and with a discount of 20% off. So Get the kit NOW, order the new products Dec 1, and get the new Sale-a-Bration items too. Really is there a downside to any of this? 


    As always, if you have any questions please reach out. I promise to help with information, with no pressureor obligation. I simply want you to get the best deal possible and get more craft products for your collection at a discount :) 


Paper Hugs, 

Shanna 

Thursday, November 25, 2021

JOIN SPECIAL TIL NOV.30


         Do you have a long wish list? Do you love a discount on your craft products? Wanna join a fantastic community of fellow Crafters like yourself? Now is the time ....til November 30.2021 you can select $165 worth of products for just $100, no shipping and no tax in some areas. You do not have to run a business you can grab the kit and deal and run. or you can be a very happy shopper and just continue to get a discount on all of the products you love. As well as early access to all new catalouge products and ordering before customers. This is a very nice perk to being a Demonstrator :) Oh and I almost forgot a FREE Paper Pumpkin Kit. 


        With the New January - June Mini Catalouge and Sale-a-Bration Promotions coming in January, Pre Order for Demonstrators is December 1st, so would you like to get early access to all the spectacular prodcuts coming. Contact me today to Join my Team & Community, your gonna love it! You can reach me with any questions at : carrottopscreativeco@gmail.com or any of my socials. I look forward to answering any questions you have. 


Paper Hugs, 

Shanna 

Saturday, November 20, 2021

RETRO CHRISTMAS WITH NEW BLING SERIES


        Hello, 


            Welcome back! Here we are at week 6, Can you believe it? Edmonton just had their first winter dump of snow this week and tempratures are droping, now if you don't know me well I am an Island Girl ( Vancouver Island) born and raised 40 years there until we moved out here, Cold is not my friend as I am Always Cold. So to have a Snow day this week, curled up in front of the fire and staying off the Terrible roads, planning all my future Blog Posts and Facebook Video's was right up my alley. I probablly had a Bailey's and Tea or Hot Chocolate in there too, cause well I did have to shovel the silly white stuff :) 


        But lets get on with our project, another couple styles of Gift Card Holders as you always need them and they are great to have in your back pocket for any time of year or holiday. 


Retired products I used were the Flowering Foils DSP which I colored with my light Real Red Stampin' Blend, and the Light Old Olive on the leaves. My Base was cut out of Retired Brushed Silver Card Stock. Ribbon accent is Old Olive/Pretty Peacock reversible ribbon.
Current Bling is the Red Velvet Paper cut out with the Stitched So Sweetly Dies, and the sentiment tag with the Messages Dies. Accented with our Rhinestones. Inside is stamped with the Christmas Seasons Stamp Set in Real Red and Soft Succulent Ink. 


To create : You will start with a Base layer of 10 1/2' x 4 1/4', score at 3', 4 1/4', 5 1/2', and 8 1/2'.
DSP you will need 2 pieces 2 3/4' x 4. and one 1 3/4' x 4.
Belly Band 6 3/4' x 1 1/4' out of Card Stock or DSP, scored at 1 5/16' & 4 3/4'.
Basic White Card Stock for inside 2 3/4' x 4.
I recommend Tear Tape or Seal + to hold your seams.

On the 4 1/4' score line is where you will make the insert hole for the giftcard to slide into, you can use a punch, die or hand cut the opening. 
Once you have the opening on the back side apply your Seal + or tear tape on each side and the bottom join.
Embellish how you wish, I kept mine pretty plain and let the DSP be the star of the show. 


ANOTHER ONE FOR YOU : 

Do you rembember the Christmas Time is Here DSP ? I had to use it, the roses and foiling in the DSP is spectacular! Although it has been retired a few years I might have a small hoard of it, don't judge ;) So I cut an image from the DSP and layered it on Retired Brass Foil Paper and fussy cut out again.The embossing on the card base came from a splatter in the retired Christmas Rose Stamp Set.
For New Bling I added accents of gold with the Gold Shimmer Ribbon, and the Gold Gilded Gems.My Base is Early espresso and my Belly Band Accent color is Garden Green which I pulled from the coordinating color suggestions on the DSP. I die cut my Flap edge with the Basic Boarders Dies.  


    You will start with a Card Stock Base 4 1/4' x 11, scored at 3 1/16' x 7 5/8'. 
On one end you will want to punch or die cut a circle to be able to slide your gift card in & out. 
Apple Seal + or Tear Tape to the punched circle side to hold down securely. 
Cut your choosen DSP to 4 1/16' x 3". You can choose to use a boarder die to accent the edge of your holders front. 
For the Belly Band you need a Card Stock piece 10 1/2' x 1 5/16' and a DSP Layer 1 1/4' x 10 1/2'.
I did a double score ( did one score and moved it just slightly up and scored again, bends around better) at 1 1/4' & 6'. Secure that with Seal+ or Tear Tape. 
**Just a tip is to make sure the belly band can slide on and off and is not too tightly secured. 

I hope you create many of your own Gift Card Holders and please share with me , here in the comments or on my other social acounts, even better Tag me in your post, I love to see what you create too. Take care til next week and I will see you back here for Week 5 where we will play with Tags.


Paper Hugs, 
Shanna 


12 WEEKS TIL CHRISTMAS COUNTDOWN SERIES


    Hello, 


        Welcome back to Week 6, If your like me the 6 week mark is where I ramp up, I have decided on my tree colors for this year, planned out my vinyet themes for certain areas in my house, like the front door area, front porch and my hutch. We have just had a dump of snow here in Edmonton overnight so its a snow day here in my world :) I created a ton of different gift card holders for last weeks series post so I thought one more week of them would be perfect as we all need ideas for them to gizz up those plain cards. 


        So lets have a look and explain how I made them ...


You will start with a Base layer of 10 1/2' x 4 1/4', score at 3', 4 1/4', 5 1/2', and 8 1/2'.
DSP you will need 2 pieces 2 3/4' x 4. and one 1 3/4' x 4.
Belly Band 6 3/4' x 1 1/4' out of Card Stock or DSP, scored at 1 5/16' & 4 3/4'.
Basic White Card Stock for inside 2 3/4' x 4.
I recommend Tear Tape or Seal + to hold your seams.

On the 4 1/4' score line is where you will make the insert hole for the giftcard to slide into, you can use a punch, die or hand cut the opening. 
Once you have the opening on the back side apply your Seal + or tear tape on each side and the bottom join.
Embellish how you wish, and you have a fun Gift Card Holder to accent any gift you give this Holiday or any other. 


ANOTHER ONE FOR YOU :


        This one is so pretty, you will start with a Card Stock Base 4 1/4' x 11, scored at 3 1/16' x 7 5/8'. 
On one end you will want to punch or die cut a circle to be able to slide your gift card in & out. 
Apple Seal + or Tear Tape to the punched circle side to hold down securely. 
Cut your choosen DSP to 4 1/16' x 3". You can choose to use a boarder die to accent the edge of your holders front. 
For the Belly Band you need a Card Stock piece 10 1/2' x 1 5/16' and a DSP Layer 1 1/4' x 10 1/2'.
I did a double score ( did one score and moved it just slightly up and scored again, bends around better) at 1 1/4' & 6'. Secure that with Seal+ or Tear Tape. 
**Just a tip is to make sure the belly band can slide on and off and is not too tightly secured. 

Then embellish with what you like keep it simple or go wild:) 


        Hope you loved these Holders and make a few yourself, please comment of post a picture of yours in the comments , we all want to see :) Come on back next week for some Tag Ideas, great way to use up scraps of DSP and not hoard them into the New Year LOL. 


Paper Hugs, 
Shanna