Saturday, November 13, 2021

RETRO CHRISTMAS WITH NEW BLING SERIES


        Hello, 

                I don't know about you, but I've been a busy little elf getting ready for christmas! I'm trying to get orders and custom work done as quickly as I can so I can concentrate of my own decorating and cards. I love what I do thou and will keep up my little workshop open right til christmas eve if I have too :) Never fear I've got your Back! Will you be giving Gift Cards as presents this year? If so, make them special with a DIY gift card holder, or two, or three... I have some cute ones to share with you today ! 

In Retro fashion I went to my retired  Plaid Tidings 6 x 6 DSP,because I love it. Who doesn't like plaid at Christmas time? The snowman from the retired Snow Much Fun Stamp Set makes this sort of masculine but fun.  The Retired Cherry Cobbler Seam Binding Ribbon was alway a fav of mine, I hope one day it will come back around, as we are seeing a few things pop back into new catalouge selections. Retired Adhesive Backed Sequins are the bling, paired up with Wonderful Snowflakes and don't forget the Wink of Stella to make the snowman look shimmery like snow. The Tailored Tag Dies made the sentiment subtle when die cut out of Crumb Cake Card Stock.  
    The inside was stamped in Crumb Cake Ink randomly with the snowflakes from the stamp set. Use a handheld hole punch for the ribbon hole or a crop-o-dile. I own the Retired Stampin' Up!® Slit punch so I used that for my card holders, but if you don't have a similar product you could just use a couple glue dots on the back of the gift card to secure. 
    I think it turned out pretty cute, and would make any recipient smile:) Please comment or share your made holders with me, I would love to see what you come up with and what stamp sets, DSP & embelishments you use. 


 To make these yourself ....


Your Base Card Stock should be 8 1/2' x 5 1/2' , scored at 1/2' & 4 1/2'on the long side. 

DSP Layer 3 5/8' x 5 1/8'.

Basic White Card Stoak 5'x 3 3/4' - for inside.

Circle punch or die - to make inside tab pullout space.

Handheld hole punch or Crop-o-dile.  

Your decoration pieces, scraps, embellishments, ribbon, ink and stamp set. 


AND ANOTHER FOR YOU ...


These Matchbook Style are so fun to make and decorate. The Pointsettia one uses Retired Pointsettia Place DSP and a belly band with the flip side of the DSP. Soft Suede Card Stock is the base i built off of. With the Poinsettia Dies I cut the flower from the Pearlescent DSP to give it the shimmer. and accented it with sprigs from the dies and layered pincone from the Christmas Pinecone Dies in Early Espresso and Crumb Cake Card Stock.A small sentiment finishes it off cut from the Stitiched So Sweetly Dies, stamped in Real Red Ink.
    The Deer front was created using the Retired dies North Pole Wonders, which i cut the deer from the Snowy White 12x 12 Velvet Sheets. The Peaceful Place 12 x 12 DSP lends itself to this more masculine holder, which is why I choose it. Paired on a Smoky Slate Card Stock Base, its subdue in nature. I had a strip off another project on my desk that I incorporated but I think it looks cool. It was made using the Wintery 3D embossing folder run thru on a piece of Basic White Card Stock and edged with Be Dazzling DSP from our last Sale-a-Bration Sale. The sentiment Tag was a piece of Basic Grey Card Stock and the Taseful Labels Dies Banner. 


     To Create These Yourself...

Card Stock Base 2 3/4' x 11', scored on the long side @ 3', 3 1/4', 7 1/4'.

DSP Layers 2 5/8' x 2 7/8' , 2 5/8' x 3 5/8'. 

You will see in the picture above you will need to cut a slit a bit wider than your gift card, I did have to play with my sizing a bit as I had gift cards that had different thicknesses, so just keep testing til you get it sliding in and out comfortably. You will place Tear & Tape on the inside flap of where you cut your slit to secure it down. If you want to keep the front flap down more secure you could use a mini magnet or small velcro dot. 


    I hope you loved these projects today, I looked forward to creating next weeks series to share with you , so make sure to drop back and see whats up for Week 6. And please comment your thoughts I would love to hear from you or see what you have made with my inspiration :) 


Paper Hugs, 

Shanna 


12 WEEKS TIL CHRISTMAS COUNTDOWN SERIES


        Hello,

            Welcome back for Week7 Gift Card Holders, Need some Ideas for all those gift cards being gifted during the holidays? Let's make them special and handmade, cause a gift card isn't fancy without a fantasticly crafted holder to slip them inside, so whether you like to give them to teachers, your mailperson, neighbour, hair stylist or nail tech. I've got you covered with some fun holders to dress up that gift card. 


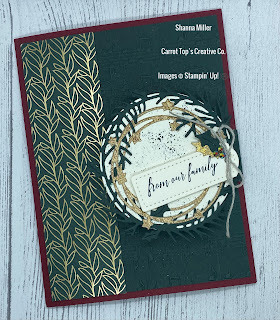
Doesn't this say Glam to you ? Red Velvet Paper, Genial Gems and the Gold Metallic 6x6 DSP really give a sparkle.You will see what I did on the inside just takes it up another knotch too. The Vine Die Cut is from Artistic Dies.

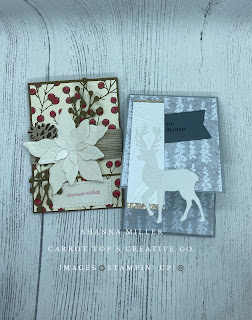
I used Tailored Tags Dies to cut two sizes out of the Red Velvet Paper and Crumb Cake Card Stock. Layered behind the Painted Christmas 12 x12 DSP is the Red Velvet Paper again, it feels exactly like velvet and just says christmas to me. I took two small strips of the Red Velvet Paper and wound them around a pencil to make curly strips that I tucked in behind the tags for some added dimension. My old fatithful Linen Thread bow and tie on to the Real Red Mini Ruffled Ribbon pull string to the inside slide, finishs off the decorating just subtly, the sentiment is stamped in Real Red Ink with the Through it Together Stamp Set. 


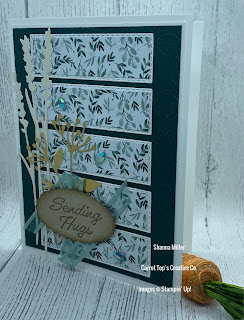
For the Inside slide out, I used Garden Green,Real Red and Soft Succulent Ink. In a first & second generation stamping technique. Which is just stamping directly ink to paper, then stamping again without putting on more ink to get a stamped off lighter look to your stamping. I punched a hole at the end to loop my ribbon thru, with just a handheald hole punch or crop-o-dile punch works too. And I have the old Stampin' Up! ® Slit punch that I made the tabs to hold the gift card with, If you dont have something similar you could attach the gift card with glue dots and skip that step. 

    To make these yourself ....


Your Base Card Stock should be 8 1/2' x 5 1/2' , scored at 1/2' & 4 1/2'on the long side. 

DSP Layer 3 5/8' x 5 1/8'.

Basic White Card Stoak 5'x 3 3/4' - for inside.

Circle punch or die - to make inside tab pullout space.

Handheld hole punch or Crop-o-dile.  

Your decoration pieces, scraps, embellishments, ribbon, ink and stamp set. 


AND ANOTHER FOR YOU :) 


This Holder design is like a matchbook, very small and can easily slip in a stocking, or gift bag or box if you are putting together a larger gift. I loved the Whimsy & Wonder 12 x 12 DSP from the second I saw it and when  I started making my samples this paper jumped out at me. It so easy to use just elements of the paper to decorate, and that is what I did by cutting out the ornament shapes I liked best. I tied a bow with Linen Thread and hung my ornaments off some scraps. The sentiment dies cut came from Tasteful Lables dies and I sponged around the edges with Blushing Bride Ink and a sponge dauber. The "For You" is from Joyful Life Stamp Set. 


The inside decorating is taken care of by the DSP so no need to get fancy, save all that for the front:) 

To Create These Yourself...

Card Stock Base 2 3/4' x 11', scored on the long side @ 3', 3 1/4', 7 1/4'.

DSP Layers 2 5/8' x 2 7/8' , 2 5/8' x 3 5/8'. 

You will see in the picture above you will need to cut a slit a bit wider than your gift card, I did have to play with my sizing a bit as I had gift cards that had different thicknesses, so just keep testing til you get it sliding in and out comfortably. You will place Tear & Tape on the inside flap of where you cut your slit to secure it down. If you want to keep the front flap down more secure you could use a mini magnet or small velcro dot. 

    So what do you think? Pretty right? Who wouldn't want to get a Gift Card now:) Makes the Starbucks or Tim Hortons Card feel pretty fancy! I hope you have enjoyed these and make a few yourself, please comment or post a picture of yours, I would love to see them:) Don't forget the Retro Series of the same projects but with a twist of Retired Items that you may have in your Craft Stash. Hope to see you back next week for Week 6 projects. 


Paper Hugs, 

Shanna 


Tuesday, November 9, 2021

Seasonal Stock Up Sale 2021


    Hello, 

        Have you got a wish list of Cardstock, Inks and Dies like I do? Well the Season Sale is coming Nov 6-18, where you can stock up and Save 10%,15% & 20% off items from the 2021-2022 Annual Catalogue. What better way to stock up the stockings of your Crafty friends & family :) 


    Here is the link to what is on Sale ... 

https://su-media.s3.amazonaws.com/media/Promotions/2021/11_Seasonal-Sale/11.16.21_FLYER_SEASONALSALE_CA.pdf


    Hope you enjoy the deals, Thank You Stampin' Up! ®. If you have any questions please feel free to reach out and if you live locally in Edmonton we can do a bulk order if you would like:) 


Paper Hugs, 

 Shanna


Saturday, November 6, 2021

RETRO CHRISTMAS WITH NEW BLING


    Hello, 

        Week 8 is here, wowzers! I can't believe the Big Day is coming so fast. I am not even close to ready, how about you ? This week we are making Scrapbook Layout Pages so we are ready to just add in those photos we took over the holidays. So with the Retro Christmas Series some of these products are now retired from Stampin' Up! ® product collection but like me, you may have them hanging about just for this special occasion:) 

    The 12x12 DSP is from retired pack called Come to Gather, I love the wood grain barnboard look, that set me off to gather natural looking elements from my craft collection. I also found a very retired Trim the Tree DSP Stack that had crumb cake and green polka dots. To which I accented our New Eden's Garden DSP with as I thought they tied together nicely. 
    The next elements I found were the retired Flowers for Every Season Memories & More Card Pack. I liked the larger card with the Sentiment on it and decided that would be my title, and I would die cut it out with the scallop circle, also in that pack I found a card I could add my journaling to with the branches, flowers and greenery, which by chance paired perfectly with the Eden's Garden DSP  I pulled as a layer piece for my photos I will add in later.  
    Retired Burlap ribbon because its amazing, and it needs to come back, and I might have 4 rolls :) Done in a swoop beind the sentiment. Layer that with Gold Shimmer Vellum die cut with the Beautiful Leaves Dies, and Gold Genial Gems to pop some bling to the neutral look.   
    So I popped some Cherry Cobbler Card Stock in just as a hint of color, once my picture is added, it will be not so in your face :) but pairs amazing with the Cinnamon Cider accents. I wrapped the Burlap Ribbon around my matting to create the look of presents as this may become a gift wrapping and opening type memory page. I embellished with the 2020-22 In Color Square Gems as I have them and have never used them yet. What, I know! So many things people... hence why I can bring you this Retro Series with retired goodies. 

    I created smaller mats below and used the Gold Shimmer Ribbon to create the same present look as above with the same embellishment as I loved how it looked on the larger mat, and you do want consistency in your overall Layout. 


    I am pretty happy with the overall look and feel of this Layout page, I can't wait to add in pictures and show it off for years to come. What are your Favorite Christmas Traditions? Do you have some strange ones? Post in the comments I would love to maybe add some new ones to what our family does.  I hope your inspired to create a page to honour them and tell that story to the generations in your families. Come back next week for some Gift Card Ideas to help you put cute packaging on those cards you have to buy for the hard to buy for, trust me I have many of those in my life:) 


    Til next time Paper Hugs, 

Shanna 

12 WEEKS TIL CHRISTMAS COUNTDOWN SERIES


    Hello, 


        Welcome back to Week 8 in the series, can you believe it the Big Day will be here before we know it! This week I wanted to focus on Memory Keeping for our Scrapbooks. 

    From family to family, there can be so many Christmas Traditions. Decorating the Tree, Baking cookies with grandma, Driving around to see the twinkle lights, Wrapping and Opening gifts, so many opportunities for layouts. The perfect way to highlight those memories and get crafty :) Sometimes I like to create a page layout and then take my pictures to coordinate. For this page Layout I had the outdoors in mind, and what Designer Series Paper would I choose but the fun Penguin Playmates from our last Sale a Bration Sale. All the cute animals that you can fussy cut out of the DSP lends well to creating an outdoor scene. 


    I tore the strips of Shimmery White Card Stock to make snowy hillsides, and layered them one on top of the other to really get that dimension of layer and build up of snow. Some of my fussy cut creatures were tucked into the layers to have to look of standing in the snow bank. Placing them on dimenionals really makes them pop off the page.  
    I pulled colors for my layers from the suggested colors in the DSP pack, and by using the backsides of some of the DSP.  Misty Moonlight, with a Neutral base of Basic Grey, can't go wrong! The wonderful products Stampin' Up! ® has all coordinate well together, which makes starting a layout simple if you just have a favorite piece of DSP to be your jumping off point. 

     For the Title of the page I thought the Sentiment "happiest holidays" from the Stamp Set heartfelt whishes was perfectly suited to my choice of Layout elements. Which I embossed with white and fussy cut around to give it a bit of whimsy. If you will notice I tucked half a Wonderful Snowflake under the edge just to tie in again my outdoor theme. Throughout the layout I trimed down the wonderful snowflakes edges to create different shapes and looks to them, as no one snowflake is identical. I finished off embellishing with the opal rounds, just for a bit more shimmer and snowy feel. 


    I really love how this Layout came together, and I am planning an outdoor shoot for when we have snow to really bring this page to life. Perhaps a snowball fight?  I hope you love it too and you are inspired to create a layout that will hightlight a tradition in your family for generations to come to look back on and smile :) 


    Check back in Next Week for some Gift Card Holder Ideas in Week 7 of this series. 

Til Then Paper Hugs, 

Shanna  

Tuesday, November 2, 2021

Eden's Garden Release


         It's Available Today! If you love Shade's of green, this set is perfect for you. The richness of Evening Evergreen, Soft Succulent, and Gold Foil accents in the Designer Series Paper will easily combine with other great colors in our Color Families, try Just Jade, Cherry Cobbler, Night of Navy, Magenta Madness. I loved cutting up the die-cuts to create custom shapes and the Cotton Paper to add unique texture. The Garden Gems are to die for, I love anything sparkly, especially for Christmas! 

    Keep in mind that if you want any of this collection , or even all of it! The Designers Series Paper, Cotton Paper and Gems are only available while supplies last, so pick them up quick to avoid disapointment. 

What a beautiful Suite wheather you want a card, a box, scrapbook or create a memories & more page. The greatest thing about this product line is that it is suitable for any occasion! Here are a few ideas to inspire you:) 


    If you would like to shop for the Eden's Garden collection use the shopping link in the sidebar, and if you have any questions please contact me, I'm happy to help :) 

Paper Hugs, 
Shanna 


Saturday, October 30, 2021

RETRO CHRISTMAS WITH NEW BLING


        Hello, 

            Welcome to Week 9 of Retro Christmas, I hope you have the Retired Merry Moose Stamp Set in your collection for this fun card using it, and paired up with the Plaid 6x6 Designer Series Paper make it the perfect neutral card for those that don't like all the flash christmas colors, But really who doesn't like all the bling colors of christmas? I know I do, I change up the coloring of decorations on my tree yearly. Humm.. What's your guess of what colors I will use this year? 


    Now the card and how you too can create it ....


Stamp Sets: Whimsical Trees, Merry Moose (retired).
Tasteful Touches Embossing Folder.
Ink: Memento Black,Cherry Cobbler, Evening Evergreen,VersaMark.
Stampin' Bleands: Bronze, (D) Crumb Cake.
Markers: Chalk, Cherry Cobbler.
White Embossing Powder & Heat Tool.
Holiday Rhinestones.
Plaid DSP (retired) 3/4' x 3 1/16'.
Basic Black Cardstock 3 1/16' x 1 7/16'. 
Scrap of Crumb Cake Card Stock for stamping.
Crumb Cake Card Stock Base 5 1/2' x 8 1/2' , scored at 4 1/4'.
Crub Cake Card Stock Layer 5 1/4' x 4'.
Basic White card Stock (inside) 5 1/4 ' x 4'. 

Start by stamping three Whimsical Trees in the center of the Crumb Cake Layer 5 1/4' x 4' piece, with the Memento Black ink. Insert that Card Stock into the Tasteful Touches Embossing Folder and run it through the Cut & Emboss Machine.Layer the embossed layer onto the Crumb Cake Card Stock Base.  On the scrap of Crumb Cake Card Stock, stamp the moose, and hat in Memento Black Ink. In Cherry Cobbler Ink stamp the scarf. With your Stampin' Blends color the moose in dark Crumb Cake, and the antlers in Bronze. with the Cherry Cobbler Marker color the hat , and use the Chalk Marker on the pom pom and hat fold. Fussy Cut out the moose, hat and scarf. Layer the hat and scarf on the moose with Tombow Glue to secure. On the top half of the Basic Black Card Stock piece stamp your greeting in VersaMark and sprinkle with White Embossing Powder, Heat Set. With Stampin' Seal apply the Plaid DSP to the bottom half of the Black Card Stock. Layer that piece flat on to the card front, in the lower righthand corner. With Dimensionals layer on the moose. Accent the stamped trees with the Holiday Rhinestones, making them look like ornaments. Stamp the Basic White Card Stock inside piece and envelope with Evening Evergreen Ink and the smallest tree stamp from the Whimsical Trees Stamp Set. Your card is ready to send out right away. 

    I hope you'll pop in next week to see what I have in store for Week 8 of the series. Til then. 

Paper Hugs, 
Shanna